iRonShore Lighthouse how-to guides
Short guides with pictures for the tasks people do most. The same guides are in the console under Help, How-to guides, with the same pictures. The pictures come from a test server with example data, so your names and numbers will differ.
- Sign in for the first time
- Add a CA (administrators)
- Enroll a certificate and download a PFX
- Approve or reject a request
- Give an ACME client a key
- Give a team its certificates with a Spotlight
- Read the Keeper's Log (administrators)
- Turn on an optional feature (administrators)
- Find your way around
- Run a report and email it
- Keep SQL Server, Remote Desktop or another Windows service's certificate current (administrators)
- Keep a certificate current on an F5, Palo Alto or Citrix ADC (administrators)
- Read and renew certificates in a cloud vault (administrators)
- Add an Outpost for a network Lighthouse cannot reach (administrators)
- Add a public CA such as Let's Encrypt (administrators)
- Prove you can replace every certificate from a CA (administrators)
- Keep the database tidy with Cleanup (administrators)
- Keep a TLS secret current in a Kubernetes cluster (administrators)
- Point cert-manager at Lighthouse ACME
Sign in for the first time
- Open the address your administrator gave you, such as
https://lighthouse.example.com. With Windows sign-in your browser signs you in by itself. Otherwise you see the sign-in box: press the main button, or open Other ways to sign in. - Sign in at your provider as you do for other work apps. You come back to Lighthouse's Dashboard.
- Administrators see Suggested next steps at the top of the Dashboard. Work down them from the top: add your CAs, scan your network, add a template, add your teams. Each step drops off the Dashboard once it is done; Help keeps the whole list, marked Done.
- Help at the top of every page, and the Help button on each page, open these guides and the topic for that page. Search Help, above the list of topics, finds any word in every topic and guide.
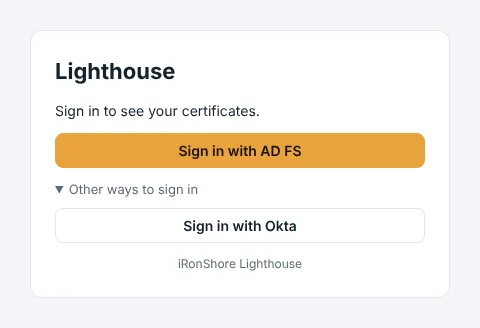
The sign-in box. The main way in is the coloured button.
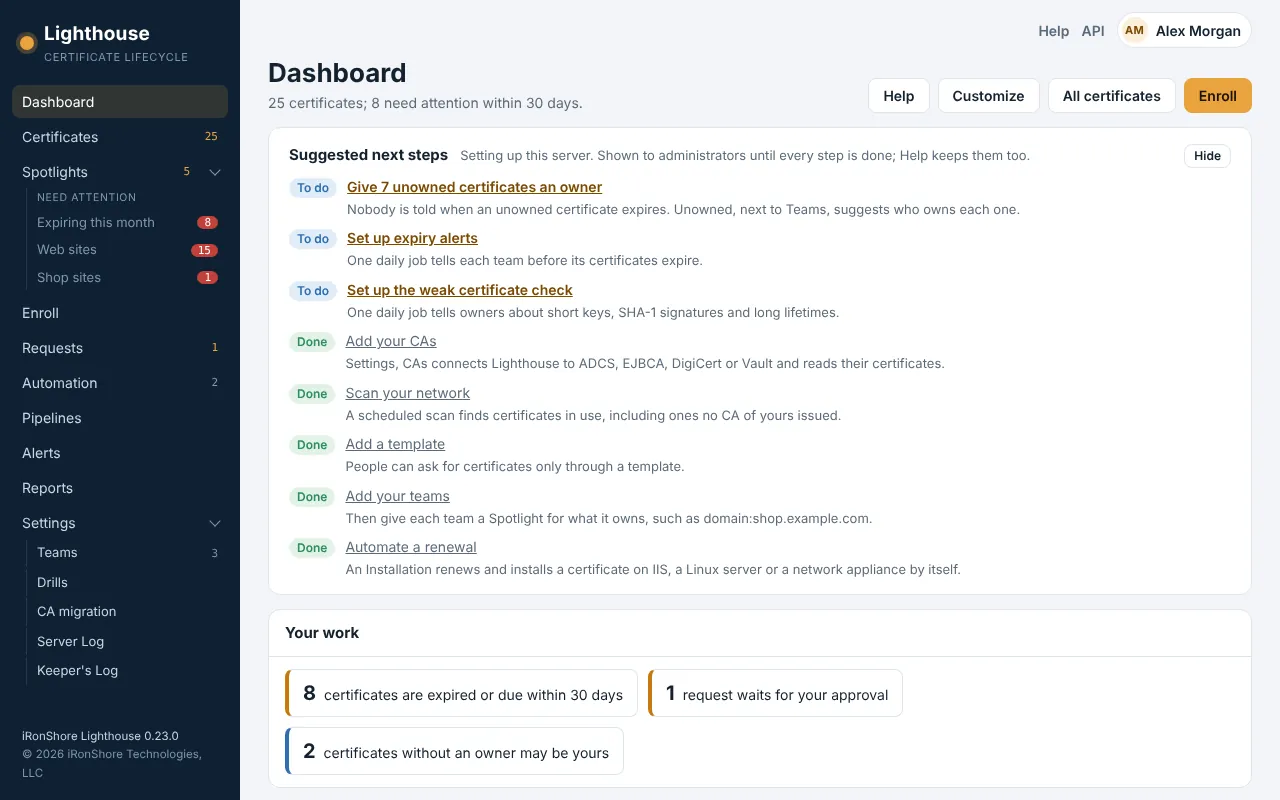
A new server's Dashboard, with the suggested next steps for an administrator.
If a page says it is not available to you, ask a Lighthouse administrator to give you access on People & Access. Setting up the ways in is in Sign-in providers.
Add a CA
For administrators. Lighthouse reads the certificates a CA issued, and issues through it once a template points at it.
- Open Settings, CAs and press Add CA.
- Pick the Kind (Microsoft ADCS, EJBCA, DigiCert CertCentral or HashiCorp Vault PKI) and give it a Name people will recognise.
- Fill in how to reach it: the config string
HOST\CA Namefor ADCS; the URL and client certificate thumbprint for EJBCA; the API key for DigiCert; the address, mount and sign-in for Vault. Keys and tokens go to the secret store and are never shown again. - Press Test connection. It reads the first issued certificate and changes nothing on the CA.
- Press Save. The CA is read every day at the time under Read it (UTC); Read now on its row reads it straight away.
- To issue from it, add a template under Settings, Templates & Policies and pick this CA.
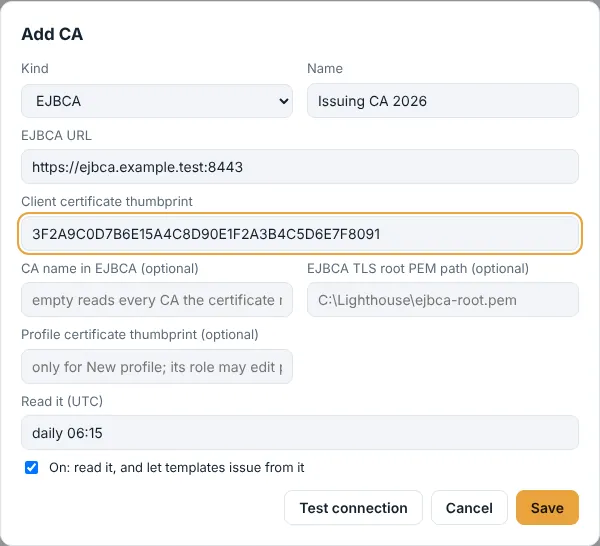
Adding an EJBCA CA. Test connection before you save.
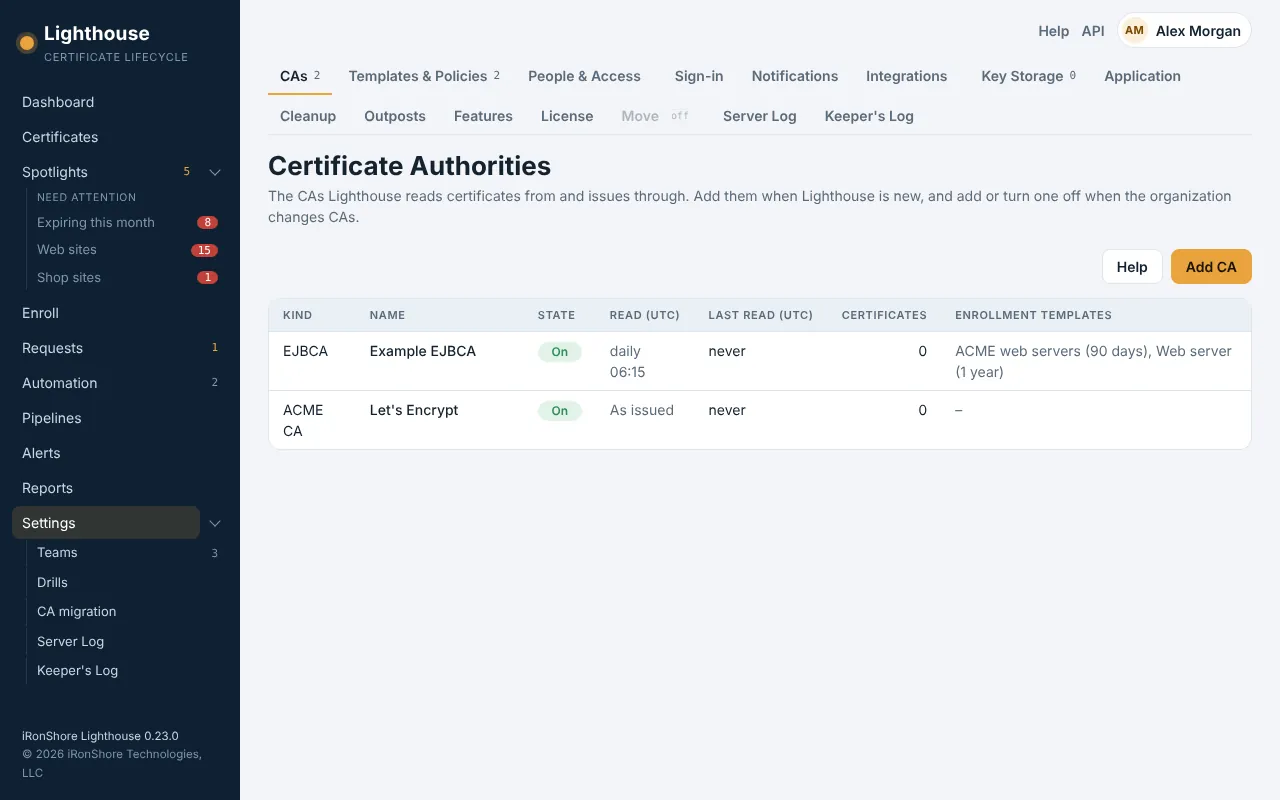
Settings, CAs once the CA is saved.
The permissions each kind of CA needs are in Running the server.
Enroll a certificate and download a PFX
- Choose Enroll in the left rail. You see the templates open to you, with each one's CA, key types, longest life and domains.
- Click a template. One marked needs approval waits for an approver before it is issued.
- Under Request, pick the team it is For, then choose Make the key here (PFX). (If the server makes its own key, choose I have a CSR and paste it instead; that is the safest choice.)
- Type the Common name, such as
store.example.com, and any Other DNS names. The template's rules are checked as you go. - Press Make key and enroll. Your browser makes the key and the PFX; Lighthouse only receives the request.
- Download the PFX and copy its password: it is shown once and kept nowhere.
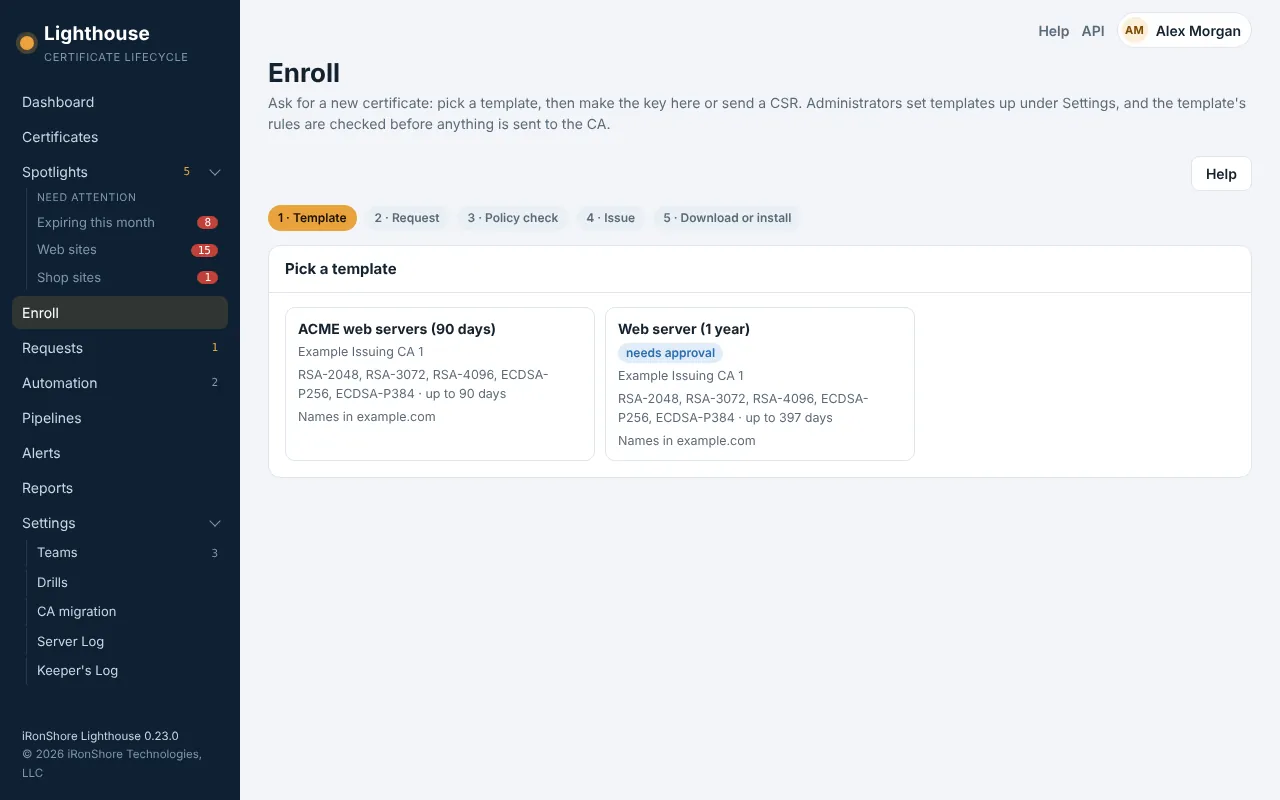
Step 1: pick a template.
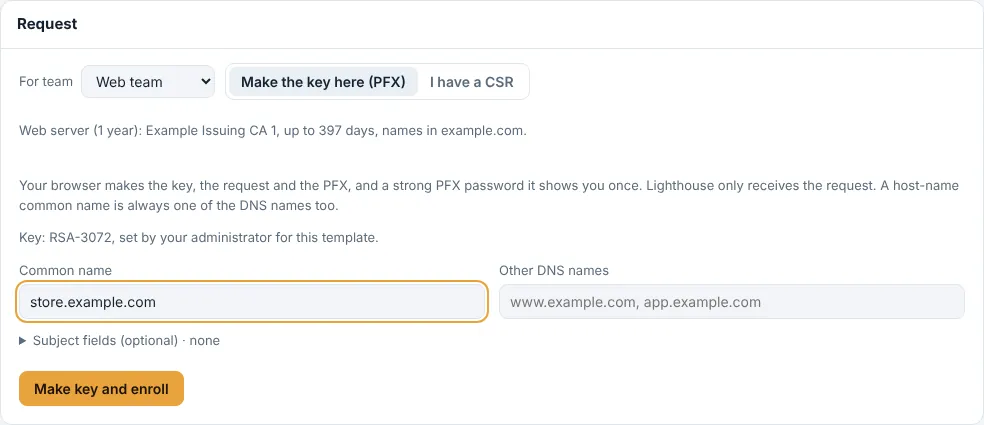
Step 2: the request, with the key made in your browser.
Approve or reject a request
For approvers. A request waits when its template needs approval or a Pipeline has an Approve step. Lighthouse emails the approvers with a link to it.
- Open Requests in the left rail, or the link in the approval email. The number beside Requests is how many wait for you.
- Read who asked, for what, for which team, their note, and which Pipeline holds it and how many approvals it still needs.
- Press Approve to carry it out straight away, or Reject…, pick a reason and add details. The requester sees the reason.
Requests opens on Waiting; decided ones move to Finished. A request with no Approve says why, such as "This is your own request": nobody approves their own, so someone else must. For testing in a lab with one administrator, see Settings, Application, General.
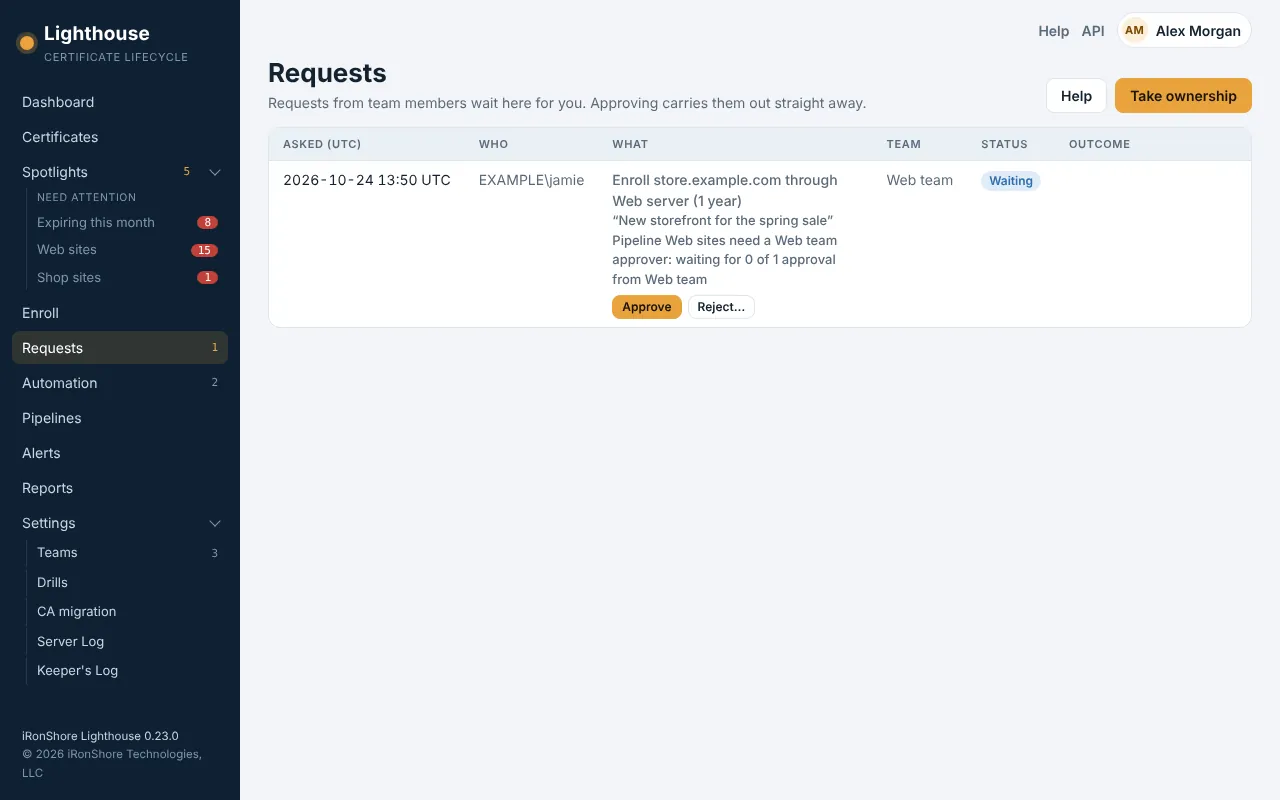
A request waiting for one approval from the Web team.
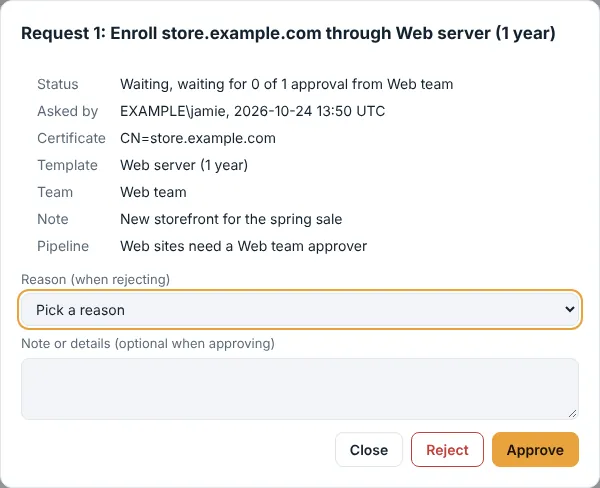
Rejecting needs a reason; approving takes an optional note.
Nobody approves their own request.
Give an ACME client a key
For administrators, and for a team's requesters once an administrator lets them or their team make their own automation (Settings, People & Access, Make their own automation). ACME clients such as certbot, cert-manager and win-acme then get and renew certificates by themselves.
- ACME is on unless an administrator turned it off under Settings, Features (see Turn on an optional feature). An administrator adds your team to a template that needs no approval.
- Open Enroll, ACME and press New ACME key.
- Say what it is for, pick the Team that will own the certificates and the Template they are issued through, and press Make key.
- Copy the ACME directory, key id and HMAC key. The HMAC key is shown once.
- Give them to the client. For certbot:
certbot certonly --server <directory> --eab-kid <key id> --eab-hmac-key <HMAC key> -d web1.example.com.
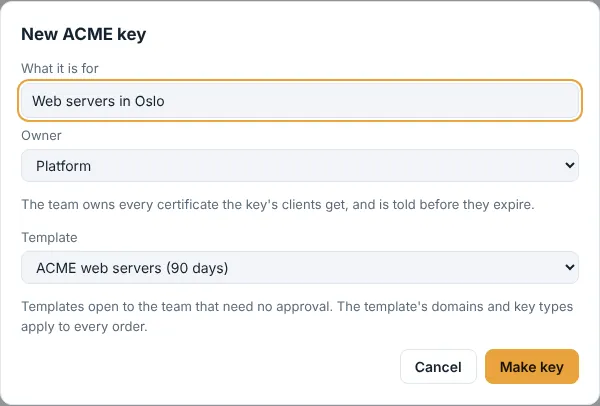
The team owns every certificate the key's clients get.
Give a team its certificates with a Spotlight
For administrators: only they make Spotlights. A team owns what its team Spotlights match, so new certificates like them belong to the team as soon as they are found.
- Open Teams (under Settings in the left rail) and press Add team: a name and the email address its alerts go to. Members on its row lists who is in it and their role (viewer, requester or operator).
- Press + Spotlight on the team's row, or + New spotlight at the foot of the Spotlight list on Certificates.
- Name it and build the rule: pick a field such as DNS name, how to compare it, and a value such as
shop.example.com. The count below shows how many certificates match today. - Set Owned by to the team and press Save. Its certificates now count for the team, and its members are told when they need attention.
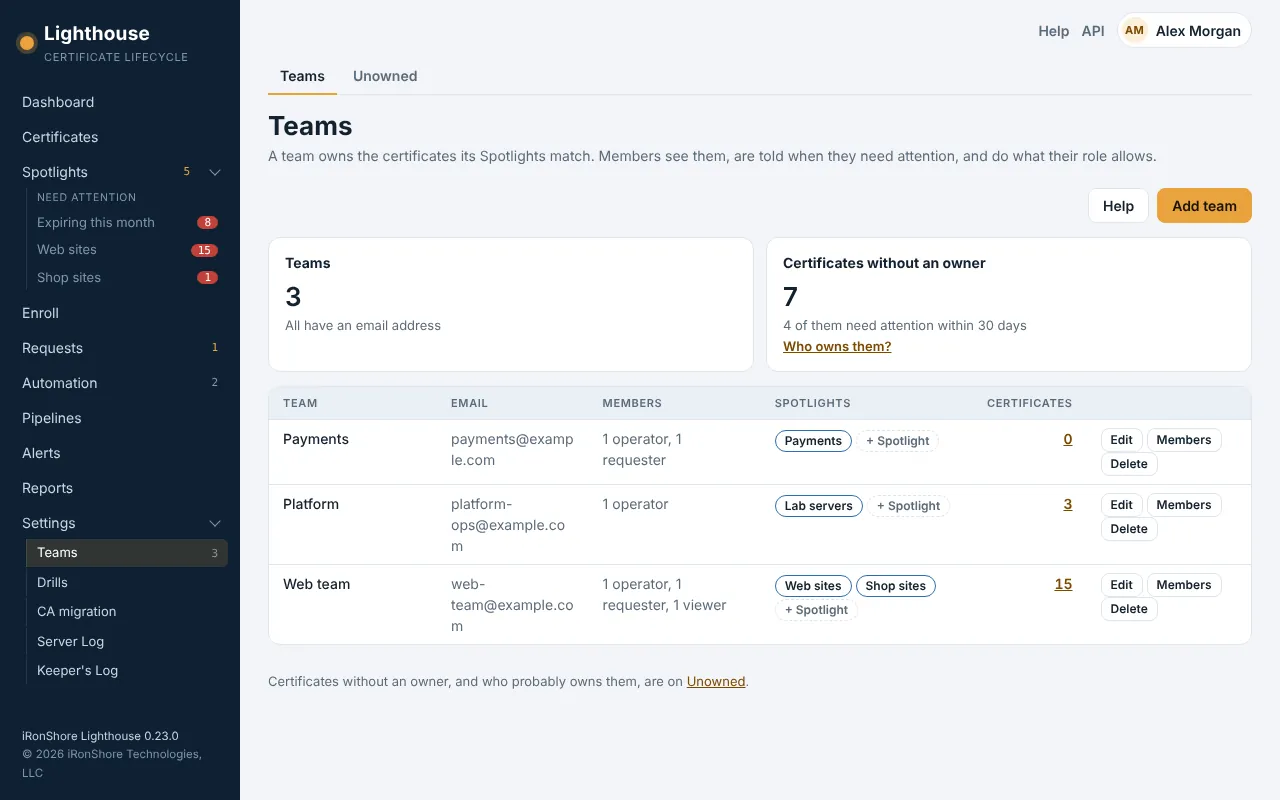
Each team with its Spotlights and how many certificates they give it.
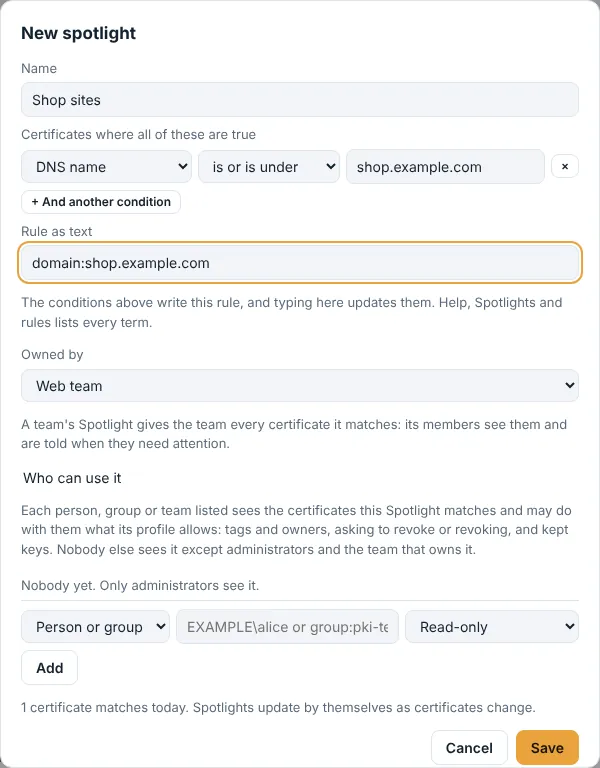
A team Spotlight: the rule says what, Owned by says who.
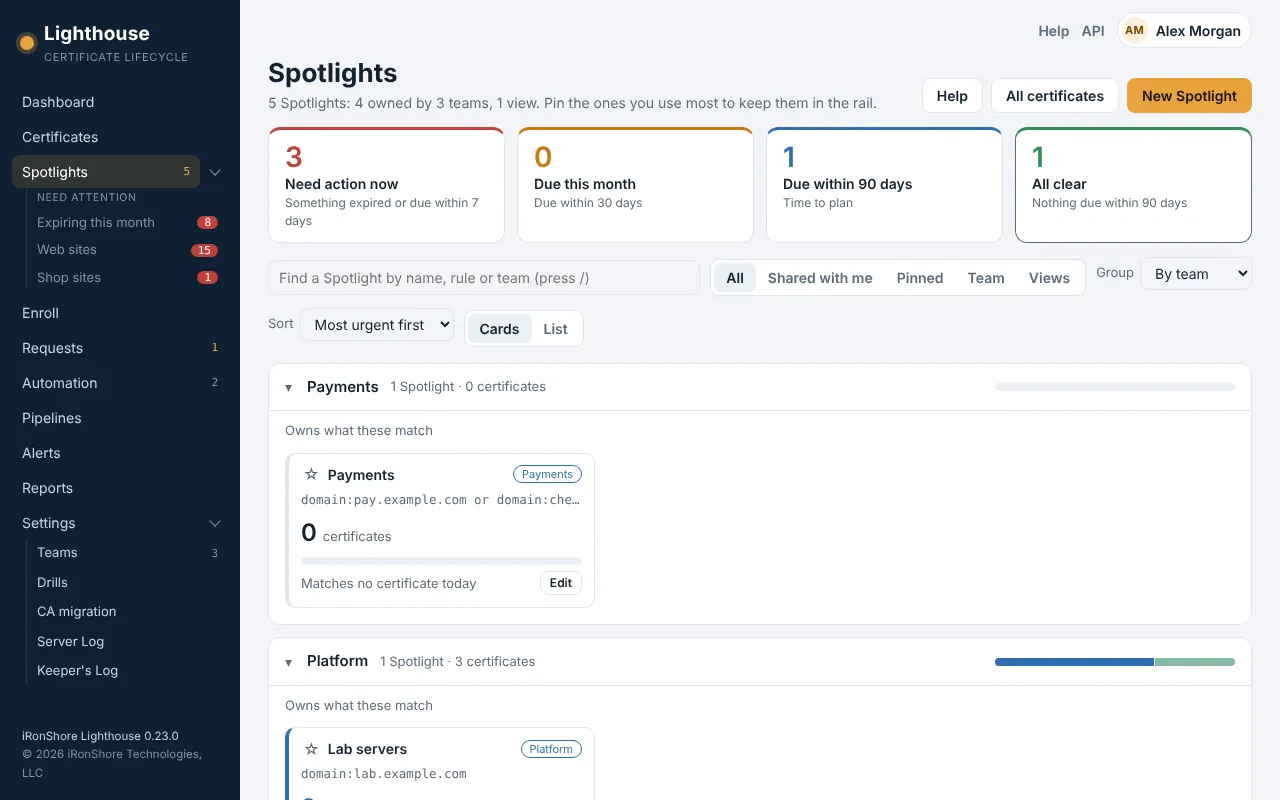
Manage Spotlights, on Certificates, shows how each one is doing.
Certificates nobody else owns are the administrators' by default. They wait in the built-in Needs an owner Spotlight on Certificates, for administrators only, with who probably owns each one. If your PKI administrators or support staff own them on purpose, tick Admins are the intended owner of unassigned certificates under Settings, Application, so the Dashboard stops asking for owners.
Read the Keeper's Log
For administrators. The Keeper's Log records every sign-in, sign-out and change, with who and when; nothing in it can be changed or deleted.
- Choose Keeper's Log under Settings in the left rail. The newest entries are at the top.
- Type in the filter box to find a person, an action such as
template-add, or a target such as a certificate's thumbprint. - Use Show for Sign-ins and sign-outs only, or Settings changes only. A settings change shows each field as it was and as it is now.
- Show older at the bottom loads the next hundred.
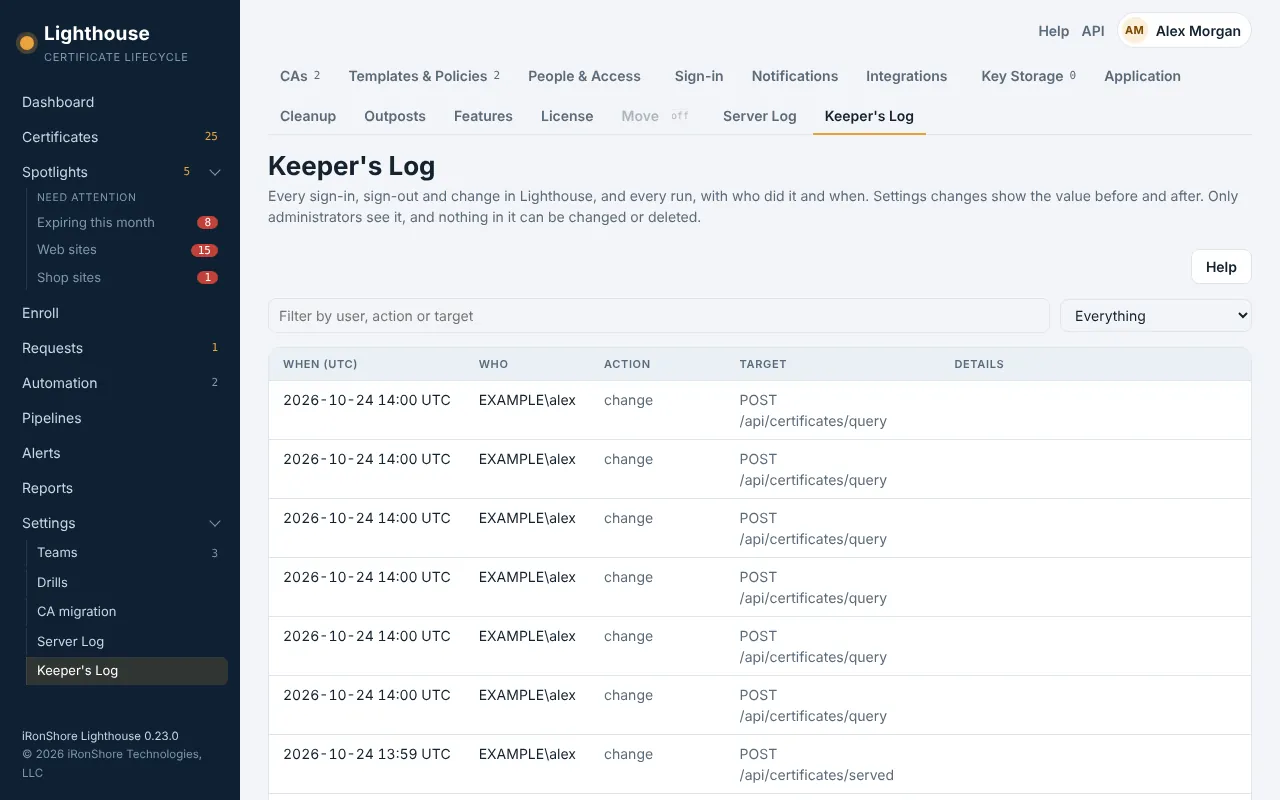
Who did what, and when, newest first.
To keep a copy in a SIEM, use log forwarding (Settings, Integrations).
Turn on an optional feature
For administrators. ACME starts on. Device enrollment (SCEP and EST), network appliances, Replace many, Move, Macs from Jamf Pro, cloud vaults, AI, Outposts and Make templates on the CA start off. Webhooks, log forwarding and the more public CAs have no switch: they are always there, and nothing happens until you add one.
- Open Settings, Features.
- Tick the feature. It says where it appears in the console, such as Enroll, ACME, and it is on at once, for everyone.
- Untick it to turn it off again. Nothing is removed: its keys, credentials or settings are there when it comes back on.
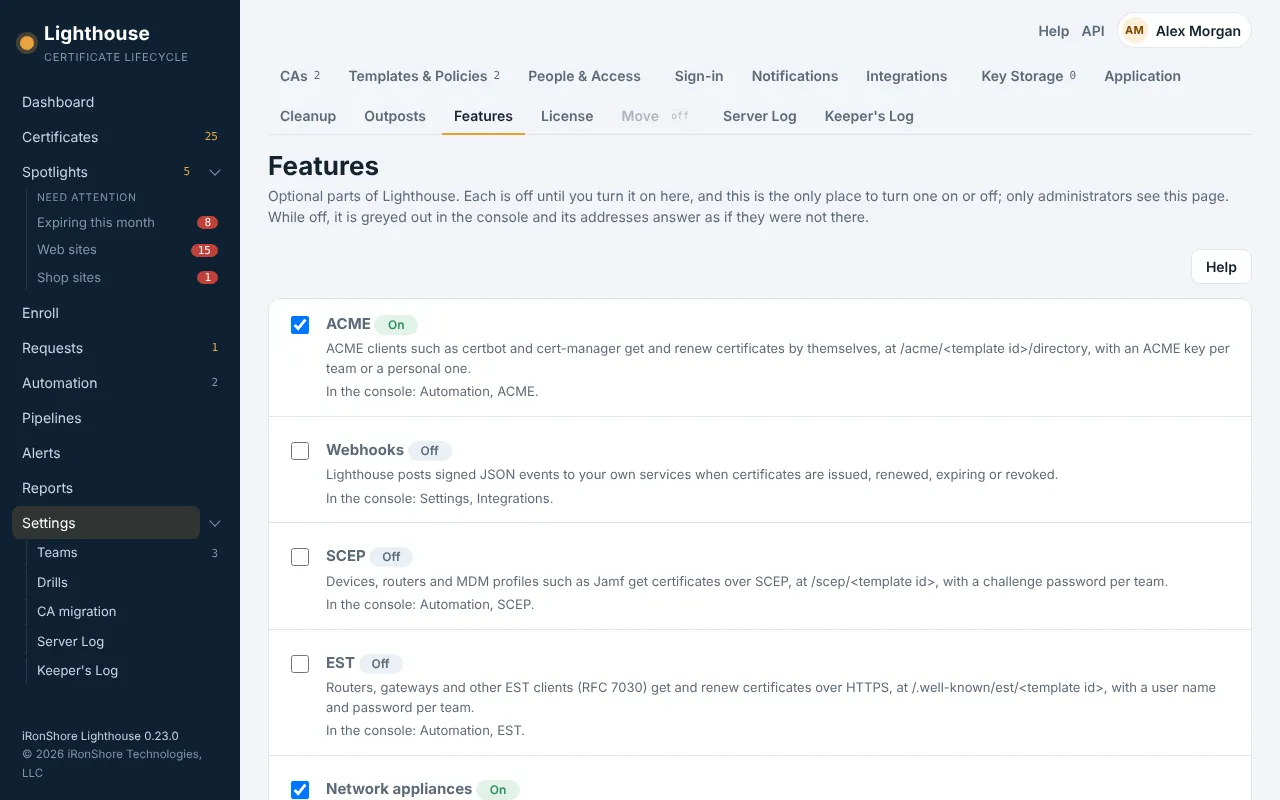
Each switch is in the Keeper's Log.
Find your way around
For everyone. The left rail lists the places you may use; what you see depends on your access.
- The rail has seven places: Dashboard, Certificates, Enroll, Requests, Automation, Reports and Settings. Places you may not use are left out. A place with several pages shows them as tabs at the top: administrators find Discovery beside Certificates, ACME, SCEP and EST beside Enroll, and Installations and Pipelines (alerts are there too) under Automation.
- Under Settings, administrators find its five groups: Connections, People (with Teams), Bulk changes (Replace many and Move), Logs (Server Log and Keeper's Log) and Server. Everyone else has no Settings, so for them Teams is a place of its own in the rail.
- The arrow beside Certificates or Settings folds away what is under it: your pinned Spotlights, or the Settings groups. Lighthouse remembers what you folded, on any browser you sign in from.
- Certificates shows 100 at a time, soonest to expire first; Previous and Next are below the table. Type in the search box, or click a chip such as Expired or one of your Spotlights, to narrow it.
- Help and API are at the top right of every page, and each page has its own Help button for the topic of that page.
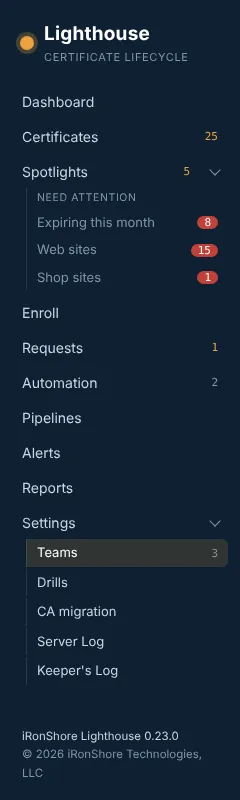
The rail of an administrator, with Settings unfolded.
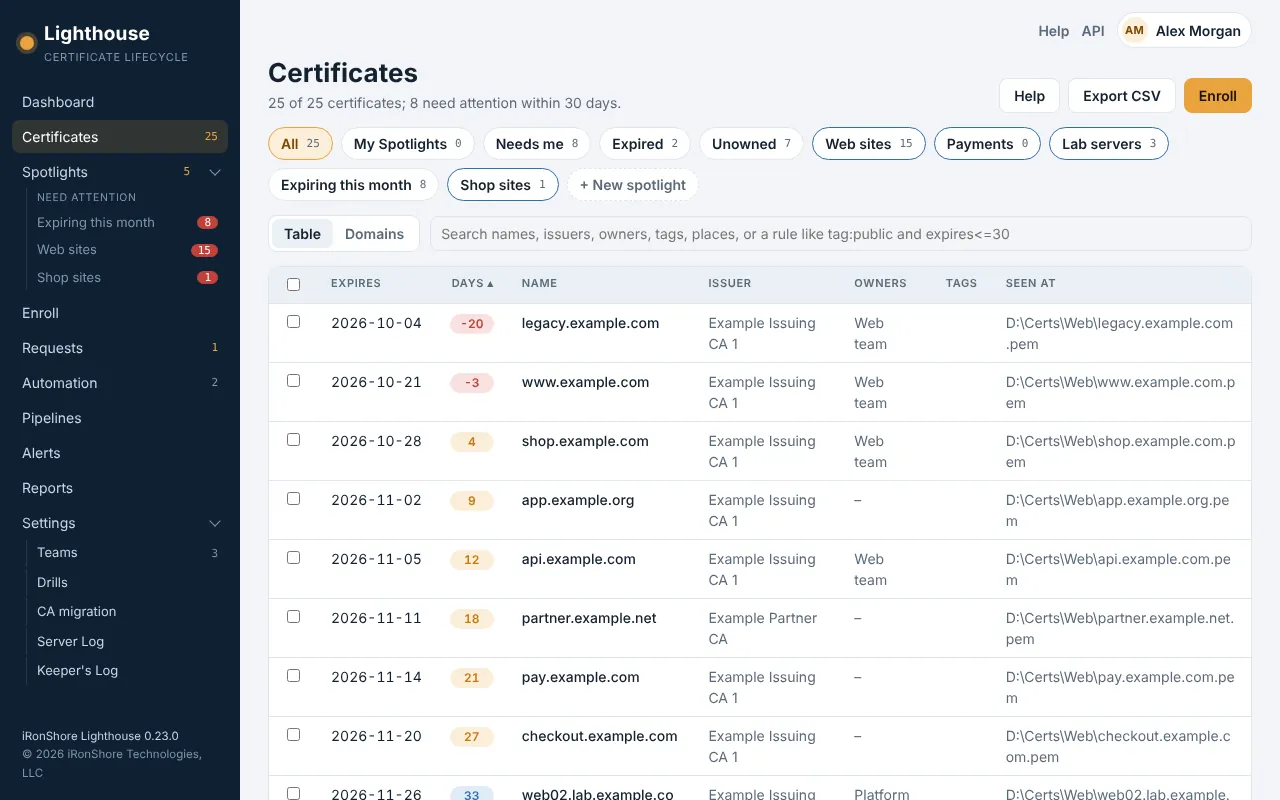
Certificates, soonest to expire first, with a chip for each Spotlight.
More in Help, Getting started and Finding certificates.
Run a report and email it
For administrators, and people given See reports or Create and change reports on People & Access.
- Choose Reports in the left rail.
- Pick a report: Expiring soon, Executive summary, Ownership or Crypto health.
- Under Over, pick everything you may report on, one team or one Spotlight. The report updates as you change it.
- Download CSV gives one file for Excel; Print or save as PDF opens the browser's print dialog with only the report.
- To have it emailed, press Save, give it a name, pick every day, week or month and a time in UTC, and type the addresses. Send now on Saved reports sends it at once.
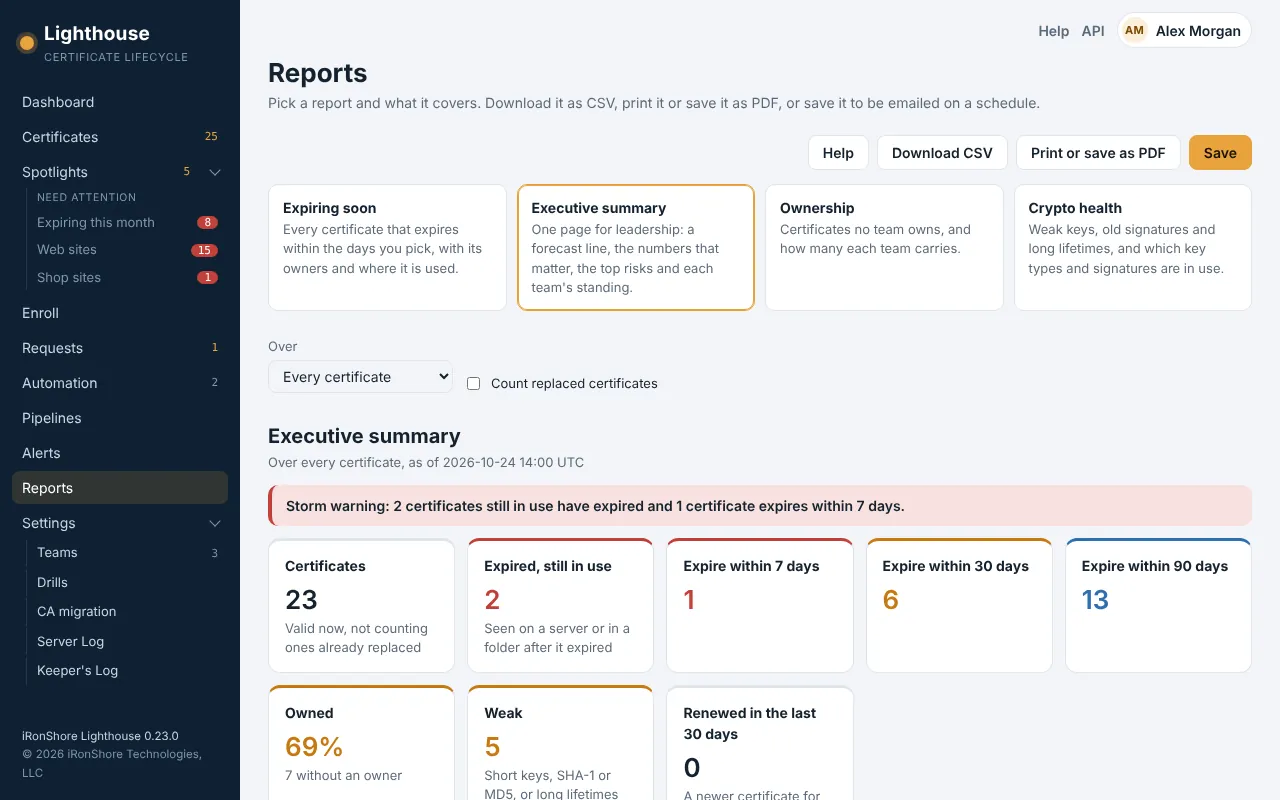
The Executive summary: the forecast line, then the numbers that matter.
More in Help, Reports.
Keep SQL Server, Remote Desktop or another Windows service's certificate current
For administrators. Lighthouse reaches the server over WinRM as its service account, as it does for IIS, and the key is made on the server, where it stays.
- Open Automation, Installations, press New installation and pick the Windows service card.
- Under Use it for pick the service: Remote Desktop, SQL Server, Exchange Server, AD FS, LDAPS on a domain controller, WinRM over https, or just the machine store.
- Fill in the Windows server and what the use asks for: the SQL Server instance, the Exchange services, or the friendly name and the service that uses it.
- Pick the template and key type. Exchange, AD FS, LDAPS and WinRM are proved by connecting to their port; give Check it is served at when clients use another name, such as the AD FS federation service name as the SNI name.
- SQL Server and AD FS restart to take the new certificate, so give the Installation a change window. Try it first with a Replace-All Drill dry run, which checks the service and the store without changing anything, then press Run now.
For an app that reads certificate files, such as Tomcat or nginx on Windows, choose Install and renew certificate files on a Windows server instead, with a PFX or PEM files and the service to restart.
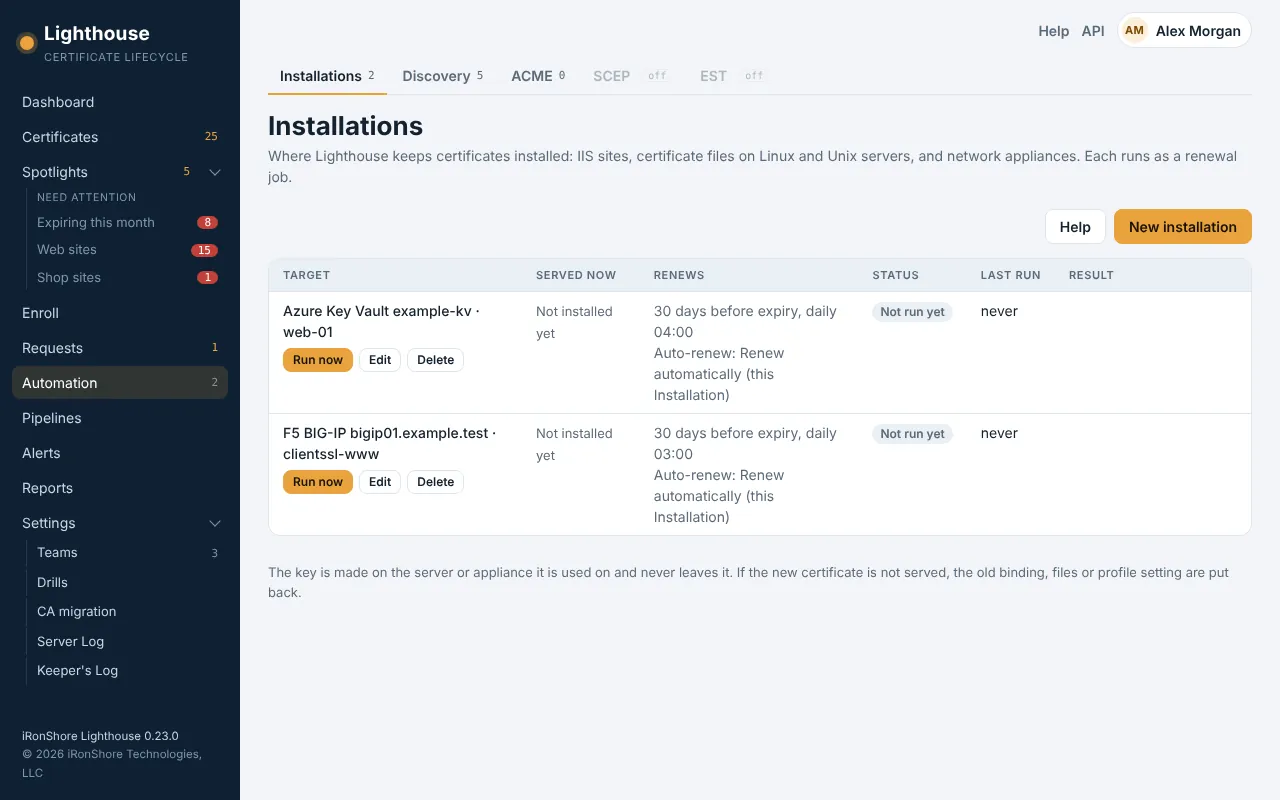
The Installations list. A Windows Installation shows the use and the server, such as SQL Server MSSQLSERVER on sql01.
More in Help, Windows services and files.
Keep a certificate current on an F5, Palo Alto or Citrix ADC
For administrators, once Network appliances is on under Settings, Features. The appliance makes the key itself; it never leaves the appliance.
- On the Lighthouse server, store the appliance account's password once:
lh secret set appliance-password. - Open Automation, Installations, press New installation and pick the card for the appliance: F5 BIG-IP, Palo Alto or Citrix ADC.
- Fill in its management address, the account, and the profile that serves the certificate (an F5 client SSL profile, a Palo Alto SSL/TLS service profile or a Citrix ADC certificate-key pair).
- Give Check it is served at, such as shop.example.com, so Lighthouse proves the new certificate is served; pick the template and key type, and save.
- Before the first real run, try it with a Replace-All Drill dry run, which signs in and reads the profile without changing anything. Then press Run now, or let auto-renew do it.
Installations on an F5 BIG-IP and in Azure Key Vault, each renewing 30 days before expiry.
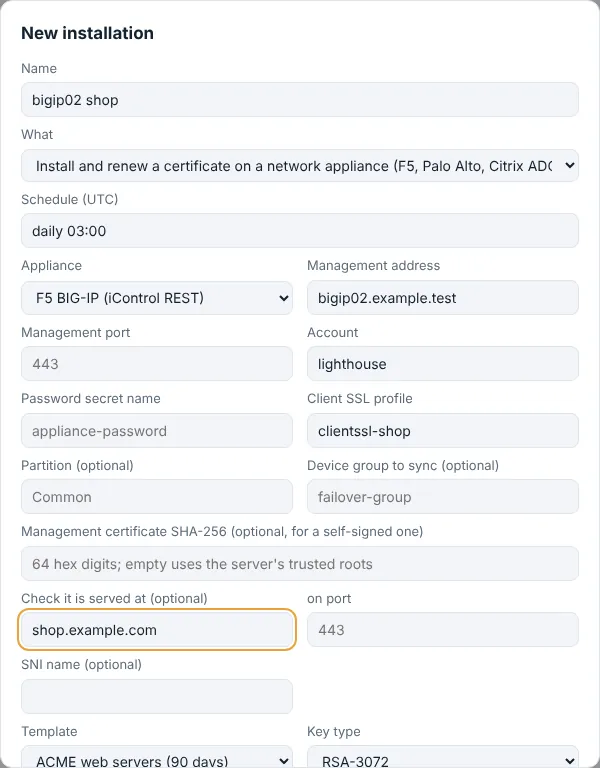
A new Installation for an F5 client SSL profile. The password is a stored secret, never part of the form.
More in Help, Network appliances.
Read and renew certificates in a cloud vault
For administrators, once Cloud vaults is on under Settings, Features: Azure Key Vault, AWS Certificate Manager and Google Certificate Manager.
- Make a credential that may read the vault (Key Vault Reader,
acm:ListCertificatesandacm:GetCertificate, or Certificate Manager Viewer) and store it on the server withlh secret set <name>. When Lighthouse runs in that cloud, it can sign in as the server instead. - Open Certificates, Discovery, press Add discovery and pick A cloud vault.
- Pick the vault and how to sign in, and fill in the vault address (Azure), region (AWS) or project and location (Google). Give a schedule such as
daily 05:30and save. - Press Run now. Every certificate in the vault comes into the inventory with the vault as its place;
cloud:rules, alerts and Spotlights include them. - To keep one current, add an Installation Install and renew a certificate in a cloud vault under Automation, Installations with the same vault, the certificate's name and a template.
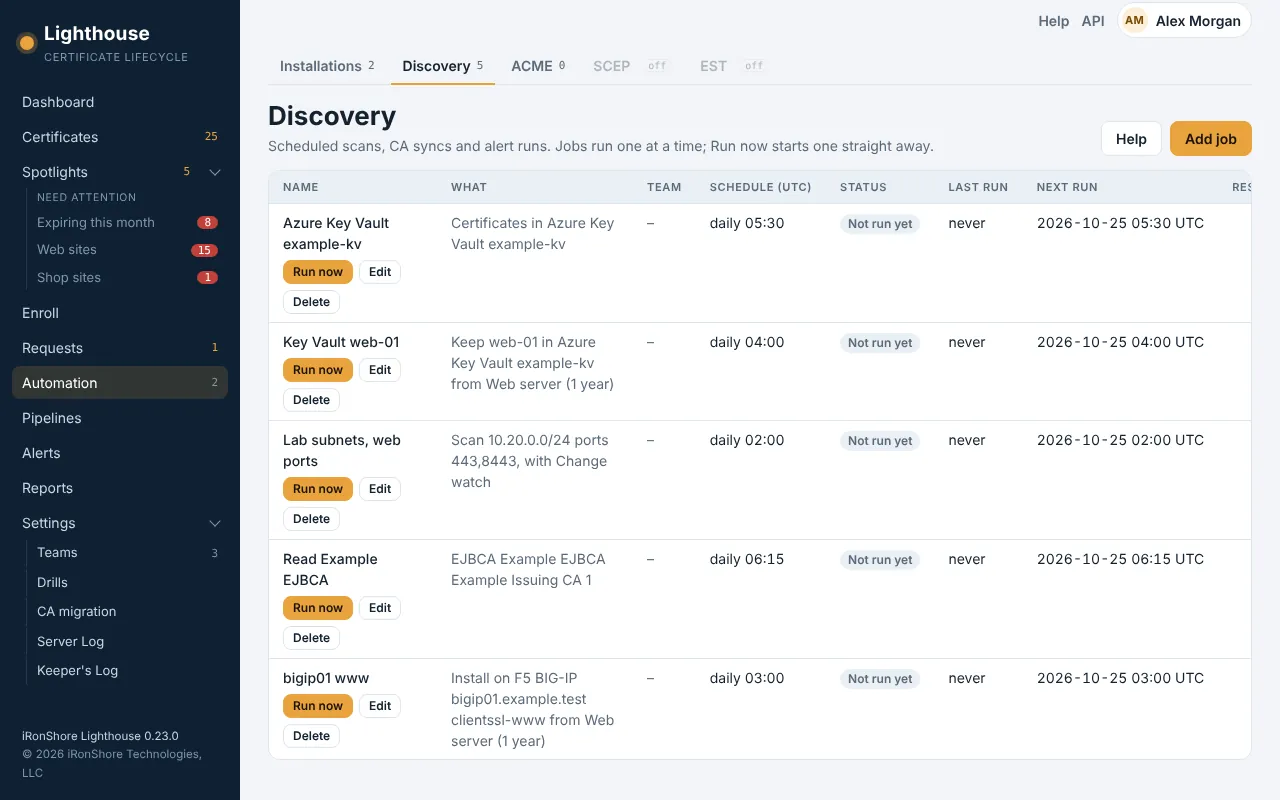
Discovery: scans, CA reads and the cloud vault read job, each with its schedule.
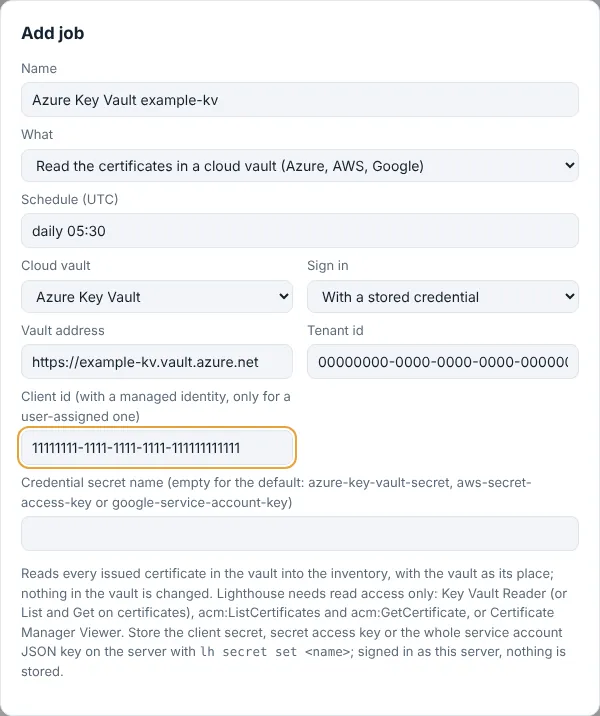
Reading Azure Key Vault. Nothing in the vault is changed.
More in Help, Cloud vaults.
Add an Outpost for a network Lighthouse cannot reach
For administrators, once Outposts is on under Settings, Features. An Outpost is a small Windows service in a DMZ or untrusted forest (or a pod in a Kubernetes cluster, see Keep a TLS secret current in a Kubernetes cluster) that calls in to Lighthouse over HTTPS and never listens on a port.
- Open Settings, Outposts and press Add Outpost.
- Give it a name, such as DMZ east, and where it is, and press Save.
- Copy the setup line Lighthouse shows. Its join code works once, within 24 hours.
- On a Windows computer in that network, download the Outpost MSI the dialog links (the version that matches this server, from
https://ironshoretech.com/downloads/lighthouse/<version>/), then double-click it and paste the Lighthouse address and join code the dialog shows into its Join Lighthouse screen. Or run the setup line (msiexec /i Lighthouse-Outpost-<version>-x64.msi SERVER=... JOIN_CODE=...) from an elevated prompt in that folder. It installs the Outpost service, joins and starts it; the row then shows Online. - For redundancy, press Add a computer on the Outpost and run the new setup line on a second computer in the same network. Both share the Outpost's work.
- Pick the Outpost under Run from on a scan in Discovery, or on an IIS, Linux, network appliance or Kubernetes Installation. Only the connections to those servers go through it.
- For a CA in that network (ADCS, EJBCA or Vault), open it on Settings, CAs and pick the Outpost under Reach it from. Reading it, issuing and revoking then go through the Outpost.
- Passwords the Outpost needs, for an appliance or for Vault, are kept on the Outpost, never in Lighthouse. Press Secrets… on the Outpost, type the name the Installation or CA gives (such as f5-admin) and the password, and press Seal and send. Your browser seals it to each of the Outpost's computers, and they take it within seconds. Or set it on each computer with
lh-outpost secret set f5-admin.
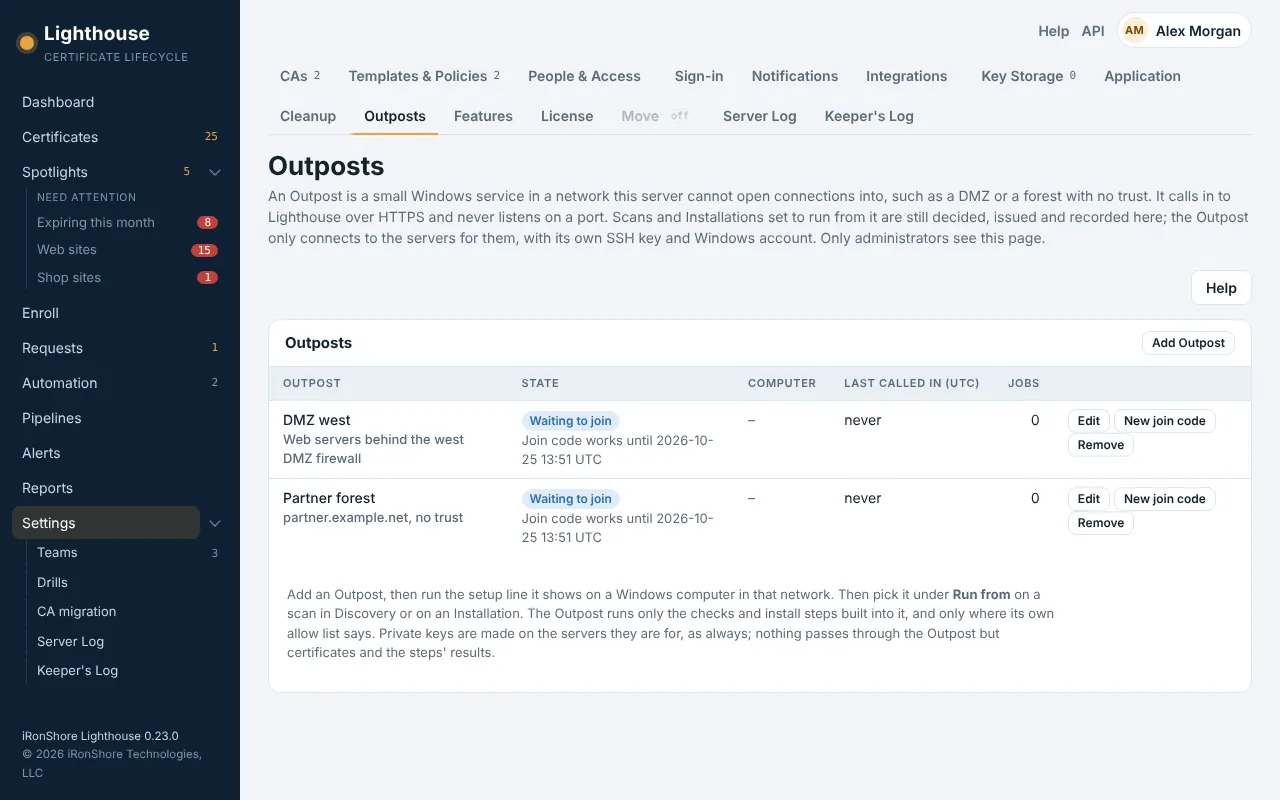
Two Outposts waiting to join, each with its join code's expiry.
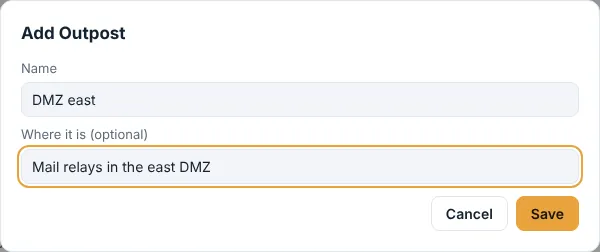
Adding an Outpost. The setup line comes next.
More in Help, Outposts.
Add a public CA such as Let's Encrypt
For administrators: any ACME CA, Sectigo Certificate Manager and GoDaddy.
- Open Settings, CAs and press Add CA.
- Under Kind, pick ACME CA (or Sectigo Certificate Manager, or GoDaddy) and give it a name.
- Pick the ACME directory URL from the suggestions or paste it, and, for a CA that gives you one, the EAB key id and HMAC key.
- Under Prove the names by, choose a DNS record in Cloudflare (with an API token allowed Zone, DNS, Edit), DNS records you add yourself, a file Lighthouse serves, or nothing for a CA that validated your domains ahead of time.
- Press Test connection, then Save. Add a template that points at it under Settings, Templates & Policies; Lighthouse opens its ACME account with the first certificate.
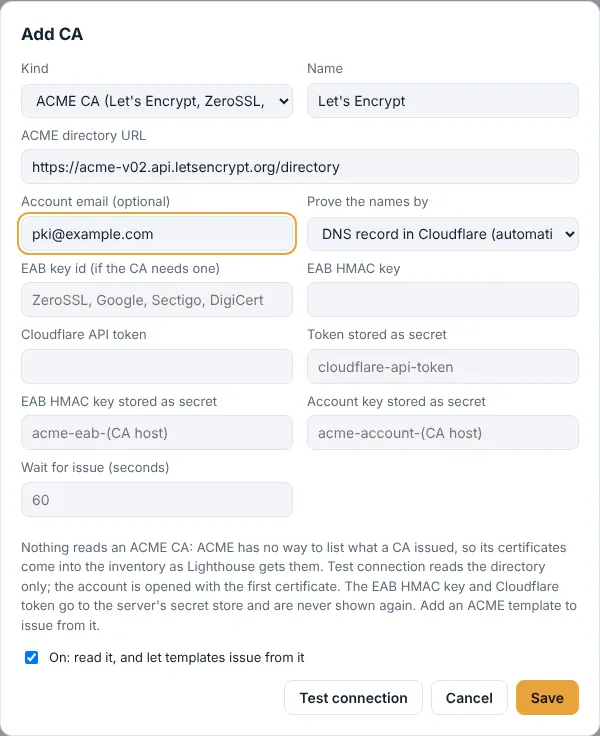
Adding Let's Encrypt. Keys and tokens go to the secret store and are never shown again.
More in Help, Public CAs.
Prove you can replace every certificate from a CA
For administrators, once Replace many is on under Settings, Features.
- Open Settings, Bulk changes, Replace many in the left rail and press New replacement.
- Pick the CA under Certificates from, and a Spotlight if you want only part of what it issued (or Any CA and a Spotlight). Leave New certificates from the same CA picked.
- Press Start dry run. It changes nothing: for each Installation it signs in where the certificate lives (SSH, WinRM, an appliance's API or a cloud vault), reads the certificate and checks the template and CA would take the renewal.
- Read each line: Ready, or what is in the way. Fix what you can and press Dry run again.
- When you are ready, press Replace all. Each Installation renews in turn exactly as its own Run now does, and one whose new certificate is not served gets its old one back.
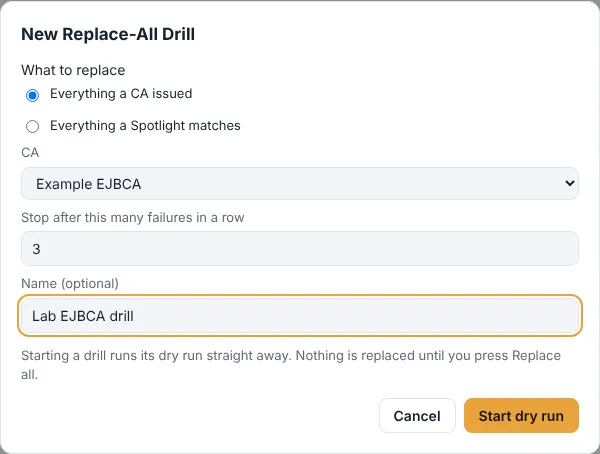
A drill for everything one CA issued, stopping after 3 failures in a row.
More in Help, Replace many. To move the certificates to another CA instead, pick Certificates from another CA and a template.
Keep the database tidy with Cleanup
For administrators. Every part of Cleanup is off until you turn it on.
- Open Settings, Cleanup.
- Read how many each part would remove now; the page shows it even while the part is off.
- Tick the parts you want: Expired certificates, Places no longer found, ACME, SCEP and EST requests and Finished approval requests, and change the days if you like.
- Press Save. Once a day the server removes what the ticked parts find; Run now runs them at once.
- Every certificate removed and every place forgotten is in the Keeper's Log, so a certificate's history outlives it.
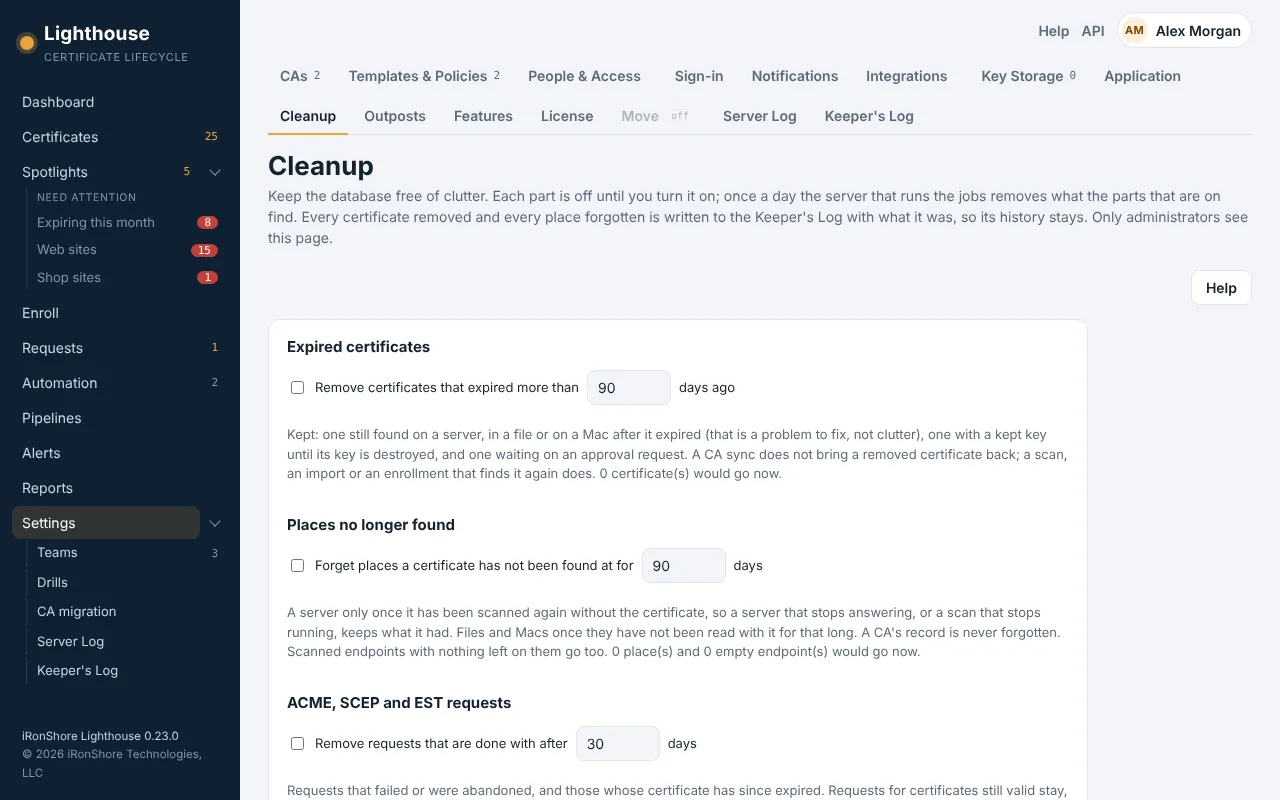
Each part off until you tick it, with what it would remove now.
More in Help, Cleanup.
Keep a TLS secret current in a Kubernetes cluster
For administrators, once Outposts is on under Settings, Features. Lighthouse renews the kubernetes.io/tls secret an Ingress or Gateway serves, through an Outpost running as a pod in that cluster, so the key is made in the cluster and never leaves it.
- Open Settings, Outposts, press Add Outpost, name it after the cluster (such as prod-east) and copy the join code.
- Put the join code and Lighthouse's address in
installer/kubernetes/outpost.yaml, set the image to the one you built frominstaller/kubernetes/Dockerfile, andkubectl apply -f outpost.yaml. The pod joins once, keeps its key in the secretlighthouse-outpost-key, and the row shows Online. - For each namespace whose secrets it keeps, apply
installer/kubernetes/namespace-access.yamlwith that namespace. Without it, Lighthouse stops before a key is made and says which rights are missing. - Open Automation, Installations, press New installation and pick the Kubernetes card. Give the cluster's name, the namespace and the secret, and under Run from pick the Outpost in that cluster.
- Leave the template on None yet and press Run now to see what is there and which Ingresses and Gateways use it, or pick a template to keep it renewed. Check it is served at with the Ingress's host proves the controller picked up the new certificate; if it did not, the old one is put back.
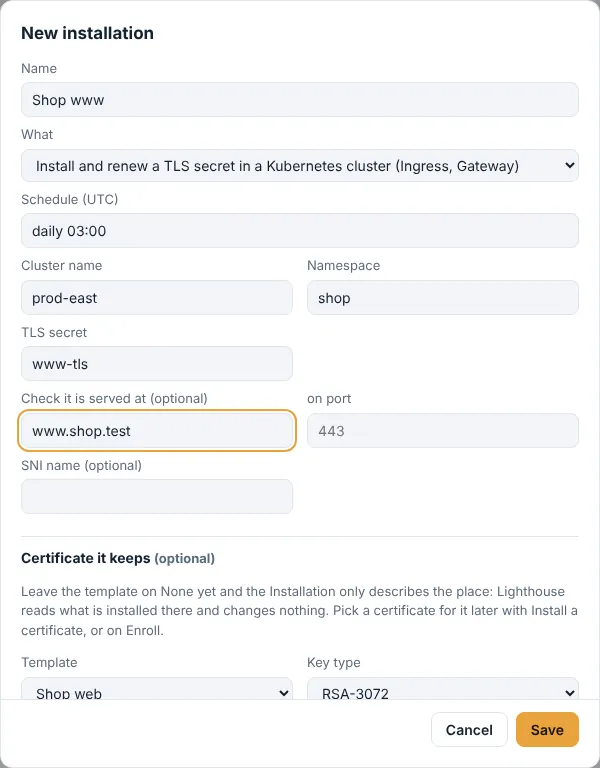
A new Installation for the secret an Ingress serves, run from the Outpost in that cluster.
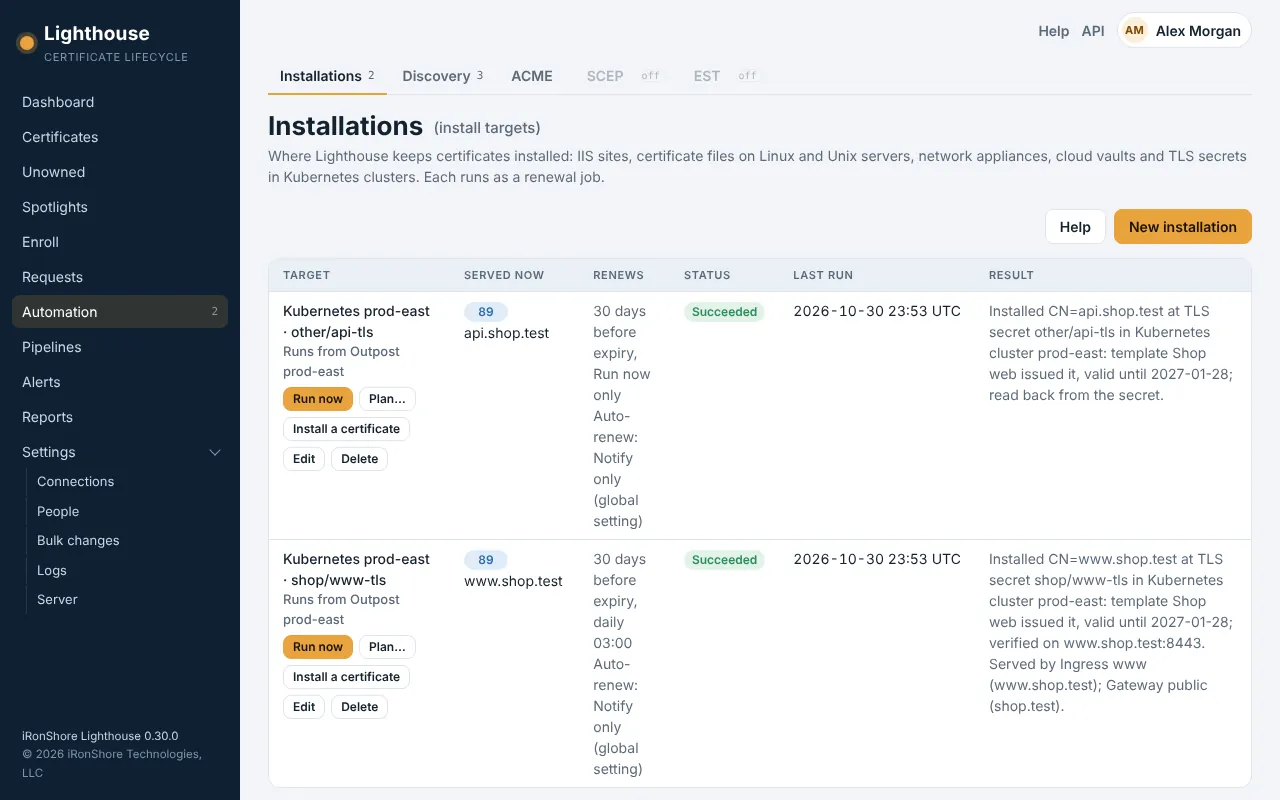
The secret's certificate, and which Ingress and Gateway serve it, after a run.
More in Help, Kubernetes clusters. A secret cert-manager keeps is left to cert-manager: see Point cert-manager at Lighthouse ACME.
Point cert-manager at Lighthouse ACME
For a cluster that already runs cert-manager: it keeps asking Lighthouse for certificates through a template, makes each key in the cluster, and the certificates come into the inventory owned by the ACME key's team.
- Ask for, or make, an ACME key under Enroll, ACME for the team that owns the cluster's certificates and a template that needs no approval (see Give an ACME client a key). Copy the ACME directory, the key id and the HMAC key; the HMAC key is shown once.
- Put the HMAC key in a secret in cert-manager's namespace:
kubectl -n cert-manager create secret generic lighthouse-acme-key --from-literal=hmac=<HMAC key>. - Add a
ClusterIssuer(or anIssuerin one namespace) withacme.serverset to the directory,externalAccountBinding.keyIDto the key id andkeySecretRefto that secret. If Lighthouse's own HTTPS certificate comes from your private CA, put that CA (base64 PEM) inacme.caBundle. - Give it a solver: http01 with your Ingress class, if Lighthouse can reach the names on port 80, or dns01 with your DNS provider, which wildcards need.
- Ask for certificates with a
Certificate, or thecert-manager.io/cluster-issuer: lighthouseannotation on an Ingress.kubectl describe certificateshows the order; the certificate then shows in Lighthouse under the key's team.
apiVersion: cert-manager.io/v1
kind: ClusterIssuer
metadata:
  name: lighthouse
spec:
  acme:
    server: https://lighthouse.example.com/acme/3/directory
    email: [email protected]
    privateKeySecretRef:
      name: lighthouse-acme-account
    externalAccountBinding:
      keyID: <key id>
      keySecretRef:
        name: lighthouse-acme-key
        key: hmac
    solvers:
      - http01:
          ingress:
            ingressClassName: nginx
---
apiVersion: cert-manager.io/v1
kind: Certificate
metadata:
  name: www
  namespace: shop
spec:
  secretName: www-tls
  dnsNames:
    - www.shop.example.com
  privateKey:
    algorithm: ECDSA
    size: 256
    rotationPolicy: Always
  issuerRef:
    kind: ClusterIssuer
    name: lighthouse
The names must be ones the template allows, and the key type one it takes. cert-manager renews when two thirds of the certificate's life has passed, or at renewBefore.
The ACME key: its team owns what cert-manager gets.
Lighthouse checks each name itself, so for http01 the Lighthouse server must reach the name on port 80. To keep a secret that cert-manager does not manage, use a Kubernetes Installation.
Updating the pictures
The pictures are WebP files in docs/how-to/, 1280 × 800 for whole pages and the dialog's own size for dialogs, light theme, taken from a test server with example data only (no customer names, hosts or certificates). The server build embeds the same files and serves them to Help at /how-to/<name>.webp, so a picture changed here changes in the console at the next build. Each picture must be named in both this page and Help, and all of them together must stay under 2 MB, each under 150 KB; a test checks both. The capture scripts (seed data with example.com names only, and a Playwright script that takes every picture from a local lh serve on SQLite) are kept with the project files, not in this repository.